Create your first project
You can start a Motif Studio project in a few minutes. Pick what you want to make, choose any product-specific options, add photos, and describe the result you have in mind.
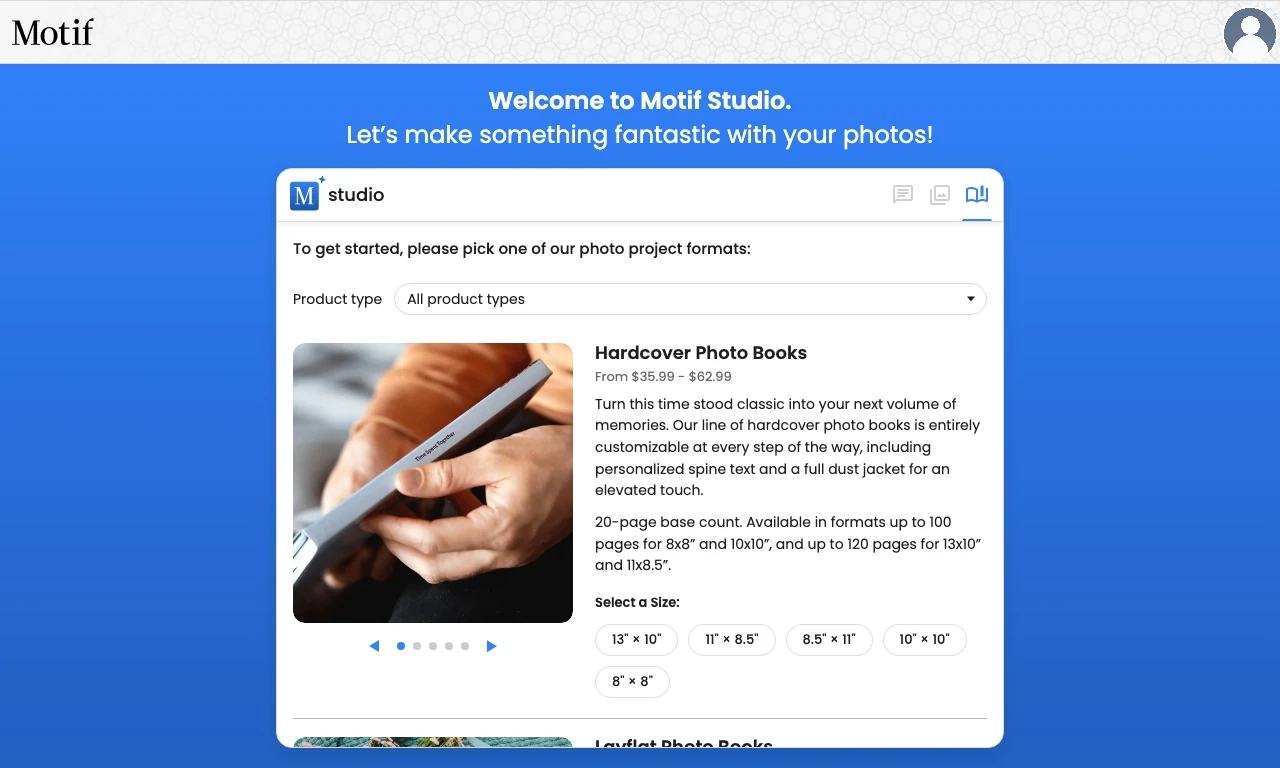
Start from My Projects
- Sign in to Motif Studio.
- Open My Projects.
- Select Create a Project or the + button.
- In Products, choose a product family and size.
Your choice creates a saved project, so you can return to it from My Projects if you leave before the draft is finished.
A Motif Studio promotional link may already name one exact product. In that case, Motif Studio skips the product picker, creates the saved project automatically, and opens the first option that product needs. If the link names more than one format, such as both card orientations, you will still be asked to choose rather than having Motif Studio guess.
When the list offers several product types, filter it by category: Photo Books, Calendars, Cards, or Notebooks. On a larger screen these appear as tabs; on a phone they appear in a drop-down. Choose All Products to show the full current list again. Filtering does not select a product or expand the available formats; choose a size when you are ready to continue.
Photo books, calendars, memo books, and cards have different surfaces and options. Once a draft exists, some product changes are limited to compatible formats. Choose the right product family before creation when possible.
Complete the product options
Motif Studio may ask one more question before photos can be added:
- Memo book: choose Text Ruled, Dot Grid, Graph Paper, or Blank.
- Wall calendar: choose the start year and month, length, first day of the week, language, and optional national holiday country.
- Desk calendar: choose the start year and month; the length is fixed at 12 months.
- Card: choose an occasion such as photo only, thank you, baby announcement, birthday, or save the date. Choose Glossy or Matte with the card format.
Photo books do not need an extra setup choice.
Add your photos
After the setup choice is complete:
- Choose Google Photos or Upload Photos from the photo-source cards. In the Mac app, Apple Photos appears first when the built-in picker is available.
- Select your photos and wait for the upload or import to finish.
- If Skip for Now appears, choose it to start with placeholders instead of selecting photos.
On a computer, you can also drag photo files onto the create page. For more detail, see Add photos.
Describe what you want
Type in the message box before or during creation. Useful details include:
- the occasion or story;
- chronological or thematic organisation;
- a visual mood, palette, or theme;
- a title and names that should appear;
- whether you want captions, and how often;
- a photo you want on the cover;
- card wording.
Example:
Make a bright, chronological photo book of our California road trip. Use the sunset beach photo on the cover, add short location captions only when helpful, and keep the pages airy.
See Guide the design for more examples.
Wait for the first draft
Creation moves through photo upload or import, image analysis, and design. You can keep using chat while most of this work continues. Keep the page open when practical, but returning to the saved project will resume the current status.
When the draft is ready, Motif Studio opens the editor. Learn what each area does in Take a tour of the editor.
If creation has started and you remember an important detail, send it in chat. Motif Studio keeps your useful project direction together for the draft.
If creation pauses
- If Motif Studio is waiting for a ruling style, calendar setup, or card occasion, complete that choice first.
- If the project needs more photos, use Add Photos until the displayed requirement is met.
- If an upload fails, refresh the page and try the failed files again.
- If the project shows a retry option, select it once. Avoid starting a duplicate project unless you no longer need the first one.
For status details, see Understand creation progress. For persistent issues, see Troubleshoot uploads and creation.