Work with pages and layouts
Layouts arrange the photos and text already on a page. As you add or remove content, Motif Studio offers arrangements that fit the current page and project.
To enlarge the interface, use your browser's zoom controls. On a touch screen, spread two fingers over the app header. This does not change the printed layout.
On a computer, use Zoom in and Zoom out above the canvas to change the size of the pages while the controls keep their normal size. Scroll within an enlarged canvas to reach the rest of a page or another page, and continue editing. Page zoom does not change the printed layout. Use Cmd/Ctrl + Shift + + / − to zoom and Cmd/Ctrl + Shift + 0 to return to the default view. On calendars, zooming out from the default view shows more months per row.
On a phone or tablet, open a page and use Zoom in and Zoom out at the ends of the row with the page arrows, or spread two fingers on the page, to enlarge it while the controls keep their normal size. Drag to move around the enlarged page and keep editing; the arrows turn pages at the same zoom, and All Pages shows every page at its usual size again. In All Pages, spreading two fingers on a page opens it. On an iPhone or iPad, page zoom needs iOS 18 or later; on an earlier version, spreading two fingers enlarges the whole screen instead.
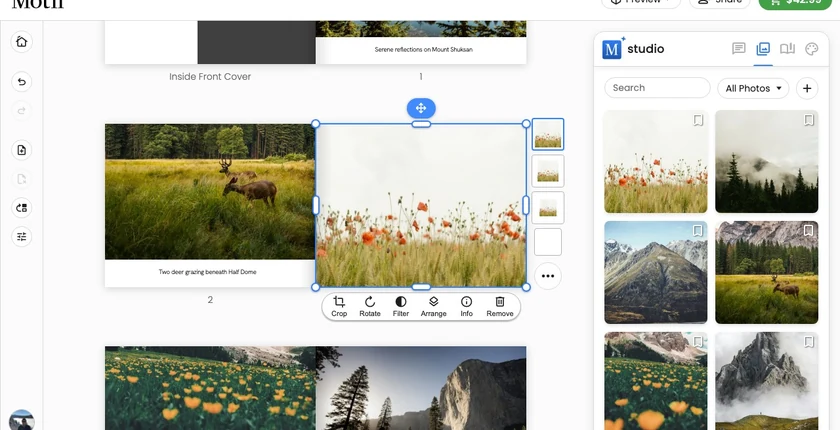
Choose a layout
- In Edit view, select or point to an open part of the page.
- Choose one of the layout previews beside the page.
- If available, choose All layouts… to see more arrangements.
- Select a preview to apply it.
For a single photo or panoramic spread in a photo book or memo book, or a single photo on a calendar month photo page (including the photo side of a desk calendar card), the three margin previews offer full bleed, the standard margin, and twice the standard margin. The binding side may be wider. These page choices take priority over the theme’s margin, and they match Margin & Gutter...: picking a margin preview sets the page margin, and choosing None (Full Bleed), Small, or Large in the dialog selects the matching preview. Full-bleed pages can reach the paper’s edge, while text and captions keep their words inside the print-safe area.
When a new arrangement changes a photo area's shape, Motif Studio reframes the photo around its detected main subject. Review the result before ordering. Undo restores the previous arrangement and its saved crop.
On a computer, use the Arrow keys to move through the full layout browser, Home or End to jump to its first or last choice, and Escape to close it. On a phone, the layout browser opens as a scrollable sheet from the bottom of the screen.
Adjust margins and gutters
For a book or memo-book page, a calendar photo page, or a card face, open Page options → Margin & Gutter.... Margin controls the space at the page edges; gutter controls the space between photos. Choose the values and select Apply. The menu starts on the value the page shows; there is no separate default option. Pick the project’s own value on either axis to follow the project again. If an earlier page choice already matches the project, apply the current selection to make it follow future project changes. Calendar covers and date grids do not offer page spacing.
In the project's Options tab, change the margin or gutter for the project. A control reads Mixed when any page uses a different value on that axis — for example a new book, where full-bleed pages have no margin while the project uses a margin. Pick any value to change it; Mixed cannot be picked. Apply preserves individual page choices, including full-bleed single photos. Apply to All clears page choices on the changed axis, except on panoramic pages. Every product, calendars and cards included, offers both actions and margin None (Full Bleed); full-bleed photos keep their layout. Undo restores the previous spacing. Page and project spacing cannot change while the editor is locked, including while a phone is held sideways for viewing. On a phone there is no tab strip: open Options in the All Pages list and choose Margins & Gutters, and the same controls open as a sheet from the bottom of the screen.
When dragging text near a full-bleed page edge, a dashed safe-area outline shows where text snaps. You can still deliberately move the box beyond it; its words retain their print-safe inset.
Customise a multi-item layout
Pages with several items may show draggable dividers between positions.
- Point to a divider until its blue resize cue appears.
- Drag horizontally or vertically to give one position more space and another less.
- Release when the balance looks right. The cue changes at an even 50/50 split.
After a custom resize, no preset layout is selected. Custom dividers are not available for single-item pages, panoramic spreads, or covers.
Resize or move a photo or text box
Every photo, text box, and map on an eligible editing surface has its own box you can resize or move freely. The same solid selection frame and handles identify every resizable item, including front-cover photos and titles. Boxes can overlap, so a text box can sit right on top of a photo.
- Select a photo or text box so its selection frame appears.
- Drag a corner or edge handle to resize the box.
- Drag the round grip at the top of the frame to move the box around the page.
Boxes snap to the page grid and to each other as you drag. See Line boxes up with the grid to turn those aids on or off.
The first drag switches the page from its preset layout to a freeform arrangement — everything stays exactly where it was until you move it. Motif Studio keeps every box inside the printable surface, including a front-cover title moved to an edge. Photos refill their new box automatically, and text that no longer fits shows the usual overflow warning.
Regular photo-book pages, calendar photo pages and covers, and card faces can hold up to 36 photos, text boxes, and maps. Presets arrange up to 9 items; calendar covers allow 7. Adding more switches to an automatic freeform grid. Removing items restores a preset only if the automatic arrangement is untouched. Boxes you have moved or resized stay in place. Choose a layout preview to reset them, or ask Chat for a custom arrangement.
Overlapping boxes stack in layers. To change what sits on top, select a photo, text box, or map and choose Arrange in its toolbar, then use Move Up, Move Down, Bring to Front, or Send to Back. Choices that do not apply are dimmed.
Box resizing is unavailable on photo-book back covers, jacket flaps, wall-calendar date grids, and captions. A photo touching a physical print edge cannot have a Border; move it inward to add one.
Line boxes up with the grid
Every page has an invisible grid inside its margins. Boxes snap to it as you drag, so photos and text land on the same lines across a project without measuring anything.
Choose Grid and Snap Options (the sliders button at the end of the project rail) to turn four aids on or off. The aids you turn on are highlighted in the menu, and the sliders button itself lights up whenever any of them is on:
- Grid Lines draws the grid as full-length lines. It is a guide only and never prints.
- Grid Cells draws the same grid as its individual cells instead, each cell outlined separately with the spacing between rows and columns left clear. Grid Lines and Grid Cells are two views of one grid, so turning either on switches the other off.
- Snap to Grid pulls the edges of a box you are dragging or resizing onto the nearest grid line.
- Snap to Object lines a box up with the edges of other boxes on the page, and with the page margins.
Each option also shows its keyboard key (G, Shift + G, S, and O), which turns that aid on or off without opening the menu.
Guides appear only while a box is actually lined up, so you can see what it caught. Your choices are remembered on this device and apply to every project you open in this browser.
To place a box freely, turn the snapping aids off, or hold Alt (Option on a Mac) while you drag.
On a single-photo book, memo-book, or calendar page that starts full bleed without a chosen page margin, resizing the photo inward gives you an inset grid. Expanding the box back to fill its photo area restores the full-bleed grid. A margin you choose in Margin & Gutter... takes priority throughout.
Dividers between positions snap the same way: a divider steps from one grid gap to the next as you drag it. Select a divider and use the arrow keys to move it in small steps, hold Shift for larger ones, or press Home or End to send it as far as it will go. Press Enter to keep the change or Escape to undo it.
Add, duplicate, or delete a spread
In a photo book, open the page’s Page options menu or use the spread controls in the project rail.
- Add New Spread Below inserts two blank pages.
- Duplicate Spread copies the selected spread and places the copy after it.
- Delete This Spread asks for confirmation before removing both pages.
The same menu also offers single-page versions of these actions:
- Add Single Page inserts one blank page immediately after this page.
- Duplicate This Page inserts an independent copy immediately after this page.
- Delete This Page removes just this page, along with one blank page from elsewhere in the book so the page count stays even.
Motif Studio preserves two-page layouts and always keeps an even page count. Adding, duplicating, or moving a single page is blocked when it would split a two-page layout; select the whole spread instead. Deleting is blocked when the page you selected is itself half of a two-page layout, and when a two-page layout sits between it and every blank page the book has; otherwise Motif Studio finds a way that leaves those layouts intact. Before adding, duplicating, or deleting a single page, review the changed left/right pairings and resulting page count.
Deleting one page needs a blank page to remove alongside it. Motif Studio takes the blank nearest the page you deleted — the confirmation names it — so the fewest pages change sides. If the book has no blank page to spare, for example when it is already at its smallest allowed size, the page is emptied instead of removed: its photos and text go, the page stays where it is, and no other page moves. A page counts as blank when it has no photos, text, or caption and you have not given it a coloured background, a pattern, custom margins, or a hand-resized grid. A page that only wears your applied theme’s background and pattern also counts as blank for a delete — the theme coloured it, not you. If the page you selected is itself the book’s only blank page, Delete is refused with a message instead of saving a change you cannot see: there is nothing to remove alongside it and nothing to clear.
Adding or duplicating a single page instead reuses plain white blank pages from the end of the book — never a themed or coloured page — or adds one there, to keep the count even. Product page limits still apply.
Make a panoramic spread
- Open the page’s Page options menu.
- Choose Make 2-Page-Spread Layout. The page must contain no more than one item.
- Choose one of the panoramic layout previews.
To return, open Page options and choose Make Single-Page Layout. The first and last spreads cannot be converted. A panoramic spread has one shared position across both pages.
Manage and rearrange individual photo-book pages
- Choose Rearrange Pages in the project rail or the page’s Page options menu. On a phone, choose it from Options in All Pages; your pages keep their size, and Done is at the top right.
- Select an interior page to separate the spread into page tiles. Covers stay locked. Click empty space or press Escape to rejoin the spreads.
- Use Add Spread without a selection to append a spread. Selecting a page changes it to Add Page; at the final page it remains Add Spread. Use Duplicate or Delete below the selection, or drag the page to the blue insertion line. On a touch screen, tap the page, then press and hold it before you drag.
- Review the page count and pairing changes before confirming. The rules for single-page actions above apply here too.
- Shift-click a spread to move both pages together. On touch screens, press and hold; with a keyboard, use Shift+Enter. Then drag without holding a key. Add, Duplicate, and Delete act on the selected spread; only deletion needs confirmation. The first and last pages move individually.
- Choose Done to return to Edit.
Every confirmed page change is one undoable action, and Undo and Redo in the project rail (or ⌘Z / Ctrl+Z and ⇧⌘Z / Ctrl+Shift+Z) work while you rearrange. If the book changes while a confirmation is open, Motif Studio asks you to review the action again instead of applying an outdated confirmation.
For the photos inside a layout, see Place, replace, or move a photo. If a page needs a new look throughout the project, see Use colours, patterns, and themes.