Add photos
Add photos when you create a project or at any time from the editor. Motif Studio keeps the project’s photo library available while you design.
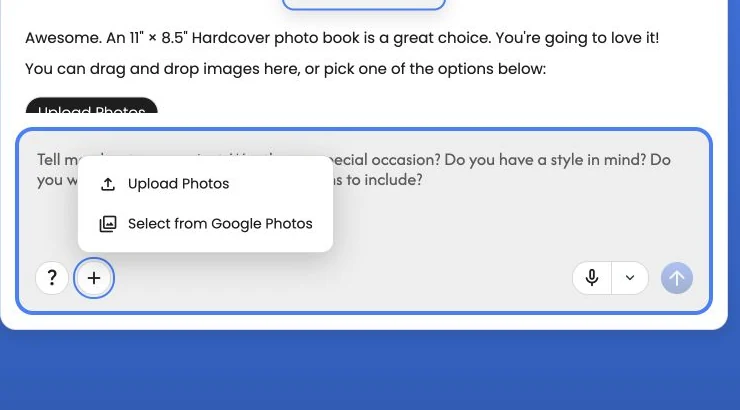
Upload from your device
- Select + Add Photos beside the Chat message box.
- Select Upload Photos.
- Choose the photos you want.
- Keep the page open while the upload progress is visible.
On a computer, you can also drag photo files onto the create page or editor. The browser and Mac app file pickers, and drag-and-drop, accept the formats listed below. Eligible files continue even if other files are skipped because of their format, filename, or size.
If any files can't be added, Photo upload results opens and lists each one under Files not added and how to retry, with its reason. A note such as 2 files weren't added stays in the chat; select it to see the list again. A finished upload doesn't mean a file was added: preparation can still turn it away, so keep the page open until preparation finishes. Review or dismiss any results dialog before the project opens.
Choose up to 1,000 photos at a time, with filenames of 255 characters or fewer, including the extension. Exceeding that batch limit stops the whole selection; choose a smaller batch. A filename that is too long skips only that file; shorten it and choose it again.
Each photo must be 200 MiB or smaller (209,715,200 bytes) and contain no more than 200 megapixels (200,000,000 pixels). Known oversized files are skipped before upload; unreadable or oversized photos found during preparation are not added to Photos. Export a smaller JPEG or PNG copy, reducing pixel dimensions if necessary.
After the accepted files finish, correct and retry only the listed skipped or rejected files. Do not select photos already added to the project again. If none can be added, choose replacement photos or use Skip for Now when offered. Photos already in your project are unchanged.
During preparation, photo files must use JPEG, PNG, HEIC/HEIF, DNG/TIFF, WebP, GIF, BMP, or AVIF. Prepared photos in these formats remain available when creating books, calendars, and cards. Icon and document formats are not accepted. DNG support depends on the file variant; if a photo cannot be prepared, export a JPEG or PNG copy.
A full-resolution original usually prints better and gives you more room to crop than a screenshot or a copy saved from a message thread.
Select from Google Photos
- Select + Add Photos.
- Select Select from Google Photos.
- Sign in to Google if prompted and allow the requested access.
- Choose the photos in the Google picker.
- Return to Motif Studio and wait for the import to finish.
Google Photos may open in another tab or window. In the Mac app, Google sign-in and the photo picker open in your default web browser, and Motif returns to the front on its own after you finish choosing photos — you can close the leftover browser tab. Motif Studio shows a waiting message while the selection is in progress. If you refresh during an active import, the project can resume checking its status.
Motif Studio can only import the items you choose through the Google Photos flow. If Google asks you to sign in again, complete that step in the Google window before returning to the project.
Continue from a connected photo service
Some connected services, such as Motif Events, can send a selected group of photos to Motif Studio. Follow the service's Create in Motif Studio link, sign in if asked, and then choose your product and its options. Once you choose a product, the assistant confirms that your photos from that service are on their way, shows what it received (the collection's name, how many photos are coming, and the collection's description when the service provided one), and starts the import; you do not add photos yourself at this step. A long description is shortened; choose Show more to read all of it. The import progress names the count as it goes, for example 5 of 14 photos, until Motif Studio starts preparing the project through the same preparation and creation flow used for other photo sources. When the service provides a collection name or description, Motif Studio uses it as context for the design, the captions, and a possible cover title. For Motif Events, this is the event's name and description. Your own instructions in the chat take precedence; to change the description itself, edit it in the connected service and send the photos again. The same confirmation appears again when you reopen the project later. If the selected product needs more photos, Motif Studio keeps the imported photos in the project so you can add more or choose a different product. If you replace the creation import with another source, the earlier collection context no longer guides the design; simply adding more photos keeps it.
After choosing a product, you can reopen that project to finish its options and continue the import. Opening a different project does not import the selected photos into it.
The handoff link is one-time and short-lived. If Motif Studio says the import is unavailable, return to the connected service and create a new link. You do not need to select the photos again unless that service asks you to.
Select from the Apple Photos library
In the Motif apps for Mac and iOS, you can add photos directly from your Apple Photos library.
In the Mac app:
- Select + Add Photos.
- Select Select from Apple Photos.
- Choose the photos in the Photos picker.
- Keep the window open while Preparing Photos and the upload finish.
In the iOS app, Upload Photos opens the device's native photo picker:
- Select + Add Photos.
- Select Upload Photos, then choose Photo Library if the device asks where to pick from.
- Choose the photos in the Photos picker and confirm.
- Keep the app open while Preparing Photos and the upload finish.
On the create page, photo sources use the same cards on every platform: Google Photos, Upload Photos, then Skip for Now when the selected product supports a photo-free start. In the Mac app, Apple Photos appears first when the built-in picker is available. The iOS app does not need a separate Apple Photos card because Upload Photos already opens the native picker for your library.
The dedicated Select from Apple Photos option appears in the Mac app when the version of macOS includes the built-in photo picker. On iOS, your Apple Photos library is always reachable through Upload Photos.
Meet the photo requirement
The starting requirement depends on what you are making:
- Photo books: no minimum; choose Skip for Now when it is offered.
- Memo books: no minimum; four or more photos are recommended for the four cover surfaces.
- Wall calendars: one photo for every selected month starts a fully photo-filled first draft automatically; after calendar setup, choose Skip for Now to begin sooner with placeholders in uncovered months.
- Desk calendars: no minimum once you have chosen the start month and year; twelve photos fill every month card, and any month without one starts from a placeholder.
- Cards: no minimum; choose Skip for Now when it is offered. One or more photos are recommended for a more personal first draft.
If a minimum applies, Motif Studio keeps showing the number still needed. Creation begins after the setup choices are complete and enough photos are available, unless you deliberately choose an offered Skip for Now path.
Start without photos
For products that allow it, select Skip for Now. Motif Studio creates a draft with temporary placeholders so you can establish colors, text, and structure first. On a calendar, Skip for Now appears only after its setup choices are complete. Any wall-calendar photos already added remain in the draft; only uncovered months start with placeholders.
Replace placeholders with your photos before ordering. Placeholder artwork is not included as a printed photo.
Add more photos later
- Open the project in the editor.
- Open Chat or Photos.
- Select + Add Photos.
- Upload from your device or choose from Google Photos.
- Open Photos to find and place the new images.
Adding photos does not automatically replace images already in the design. Drag a new photo into a photo area, use the replacement control, or ask Chat for a specific change.
See Place, replace, and move photos.
Prepare a useful photo set
- Keep photo dates and location information when you want chronological storytelling or journey maps.
- Include several choices for important people or moments.
- Remove obvious screenshots, accidental frames, and exact duplicates when convenient.
- Do not worry about arranging the files perfectly before upload; you can guide the order in Chat.
- For calendars, make sure the set covers every season or month you want represented.
Motif Studio may leave near-duplicates or unusable photos out of the first draft. They can still remain available in Photos for you to place manually.
When an upload does not finish
- Wait for any active progress message to finish or report an error.
- Refresh the page and reopen the saved project.
- Try the failed photos again in a smaller group.
- If one file repeatedly fails, export a fresh JPEG copy and upload that copy.
- If Google Photos does not return, close its picker and start a new selection from Motif Studio.
For more help, see Troubleshoot uploads and creation.